 The more pictures I extort from Red, the more i have to write about. It's weird!
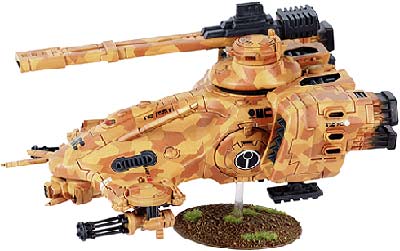
So, this little project started out an article about how to paint a Tau Hammerhead. It detailed the stippling technique, and I thought I could adapt it to the Kodiak. I do not find myself among the fans of the rather drab 5th Border Legion brown-green of the 'standard Kodiak.'
So, I present, the Camo-diak, as a work-in-progress. The more I worked on the stippling technique, the more I realized the 4-5 step technique as detailed in the article was well suited to large armor plates and the like, and less so for War jacks with bendy parts and such. In at least two of the steps, I completely undid the stippling of the previous step. As a new technique, it still requires a little experimentation.

The final step in the article was to tape off huge lightning-bolt shaped sections and paint the still uncovered areas with a sandy-tan. Ummmm...no. I was really in like with the stippled areas. I think it provides a nice transition from deep woods to rolling hills. Since it is still a work in progress, I haven't decided on the final metal accents in the shoulder area. I usually prefer GW Dwarf Bronze for the roller-ball shoulders, but the Kodiak has an armored plate modeled over it, so I may do some more thinking.
 The Kodiak is a more advanced design, as detailed by the fluff, and I wanted to highlight that with my paint scheme. I usually do a Bronze and Boltgun split for the stacks. Kodiak has a different cast than the standard design, so I did solid Boltgun with some heavy staining. Also, the advanced boiler design is designated with the Boltgun boiler cap as detailed in a previous post.
Overall, on my first attempt, I wasn't really happy with the final result. In a few places, the increasingly light over-stipple blurred the subtle under colors. There were places I blacked out and started over. I also began thinking about color changes for the next Kodiak I paint in this way. Oddly enough, about the same time I was thinking about the next one, Indiana had "the last big snowfall of the year." Heavy and wet, I was able to see, the snow laden pine evergreens. I have some exciting ideas for Mark 2 and 3!

The end result was fairly murky, privings its worth as a Camo scheme! However, it was a little drab. As shown, I painted a fairly intense and heavy edge line on most plates with a slightly brighter color than the final stipple. The great part about stippling is that you don't have to do all that time-consuming shading and blending. Don't get me wrong, (if I fall to a mode of fashion) I think the end result of my standard paint job is quite good. This has its merits too. The variation in color of stipple adds depth.
 This final pose allows me to expound on final colors. The fist plates will be black, with metallic spikeys. The back of the fist plates will be solid black. with a dark paint job like this, the scratches and dings of final weathering will stand out better, as well as some mud and dust and a little rust. all the good things in life!


No comments:
Post a Comment